The Battle of Arnhem failed because Allied airborne troops landed too far from their objective, faced stronger German resistance than expected, and could not be relieved in time by the advancing ground forces. Fought from 17–25 September 1944 as part of Operation Market Garden, the battle aimed to seize the bridge over the Lower Rhine and open a route into northern Germany. British troops landed several miles west of Arnhem, and only one battalion reached the bridge, while German counterattacks blocked the rest of the division. Communication failures, staggered landings, and poor flying weather disrupted coordination, reinforcements, and resupply. Meanwhile, British XXX Corps advanced along a narrow road vulnerable to traffic jams and German attacks, delaying its arrival. The isolated bridge defenders were eventually overwhelmed, while the remaining airborne troops fought around Oosterbeek before survivors withdrew across the Rhine. Arnhem’s failure left the Allies without the Rhine crossing needed to complete Market Garden and ended hopes of a rapid advance into Germany through the Netherlands.
The Plan to End the War by Christmas
By September 1944, the Allies had broken out of Normandy and were advancing rapidly across France and Belgium. German armies had been pushed back, and many Allied commanders believed that the war might be won before the end of the year if they could cross the Rhine and enter Germany.
Field Marshal Bernard Montgomery proposed a bold plan called Operation Market Garden. Allied airborne troops would land behind German lines and seize a series of bridges across the Netherlands. British XXX Corps would then drive north along a narrow corridor, link up with the airborne forces, and cross the Rhine at Arnhem. From there, the Allies could enter Germany and threaten the Ruhr, its industrial heartland.
The plan had two parts. Market was the airborne operation: the American 101st and 82nd Airborne Divisions would capture bridges around Eindhoven and Nijmegen, while the British 1st Airborne Division, supported by the Polish 1st Independent Parachute Brigade, would seize the bridge at Arnhem. Garden was the ground advance: XXX Corps, led by Lieutenant-General Brian Horrocks, would move north along the captured bridges to relieve the airborne troops.
It was an ambitious plan. The airborne troops would have to hold their objectives until the ground forces arrived, while XXX Corps would have to advance roughly 60 miles in four days. If any part of the chain failed, the entire operation could collapse.
The Bridge That Mattered Most
Arnhem was the final objective and the most difficult one. The bridge over the Lower Rhine was the gateway to Germany. If British paratroopers could seize it and hold it, XXX Corps could cross the Rhine and continue into Germany.
But the 1st Airborne Division was given a difficult task. It was to be dropped several miles west of Arnhem, near Oosterbeek, rather than directly beside the bridge. Allied commanders feared that German anti-aircraft guns around the town would make a closer landing too dangerous. This meant the paratroopers would have to fight their way into Arnhem before they could capture the bridge.
The division was also lightly equipped. Paratroopers carried rifles, machine guns, mortars, and anti-tank weapons, but they had no heavy artillery and very limited transport. Once on the ground, they would depend on the RAF for supply drops and on XXX Corps for reinforcements, tanks, and relief.
Allied intelligence suggested that German forces in the area were weak and disorganised. But this was dangerously wrong. Elements of two German SS Panzer divisions were refitting near Arnhem, with tanks, artillery, and experienced troops. The warning was available, but it was not treated seriously enough.
Imperial War Museums — What Went Wrong at the Battle of Arnhem
Imperial War Museums — Why Did Operation Market Garden Fail
National Army Museum — Operation Market Garden
Encyclopaedia Britannica — Operation Market Garden (1944)
wikipedia - Operation Market Garden
BBC History — The Battle of Arnhem (Operation Market Garden)
The Landings Begin
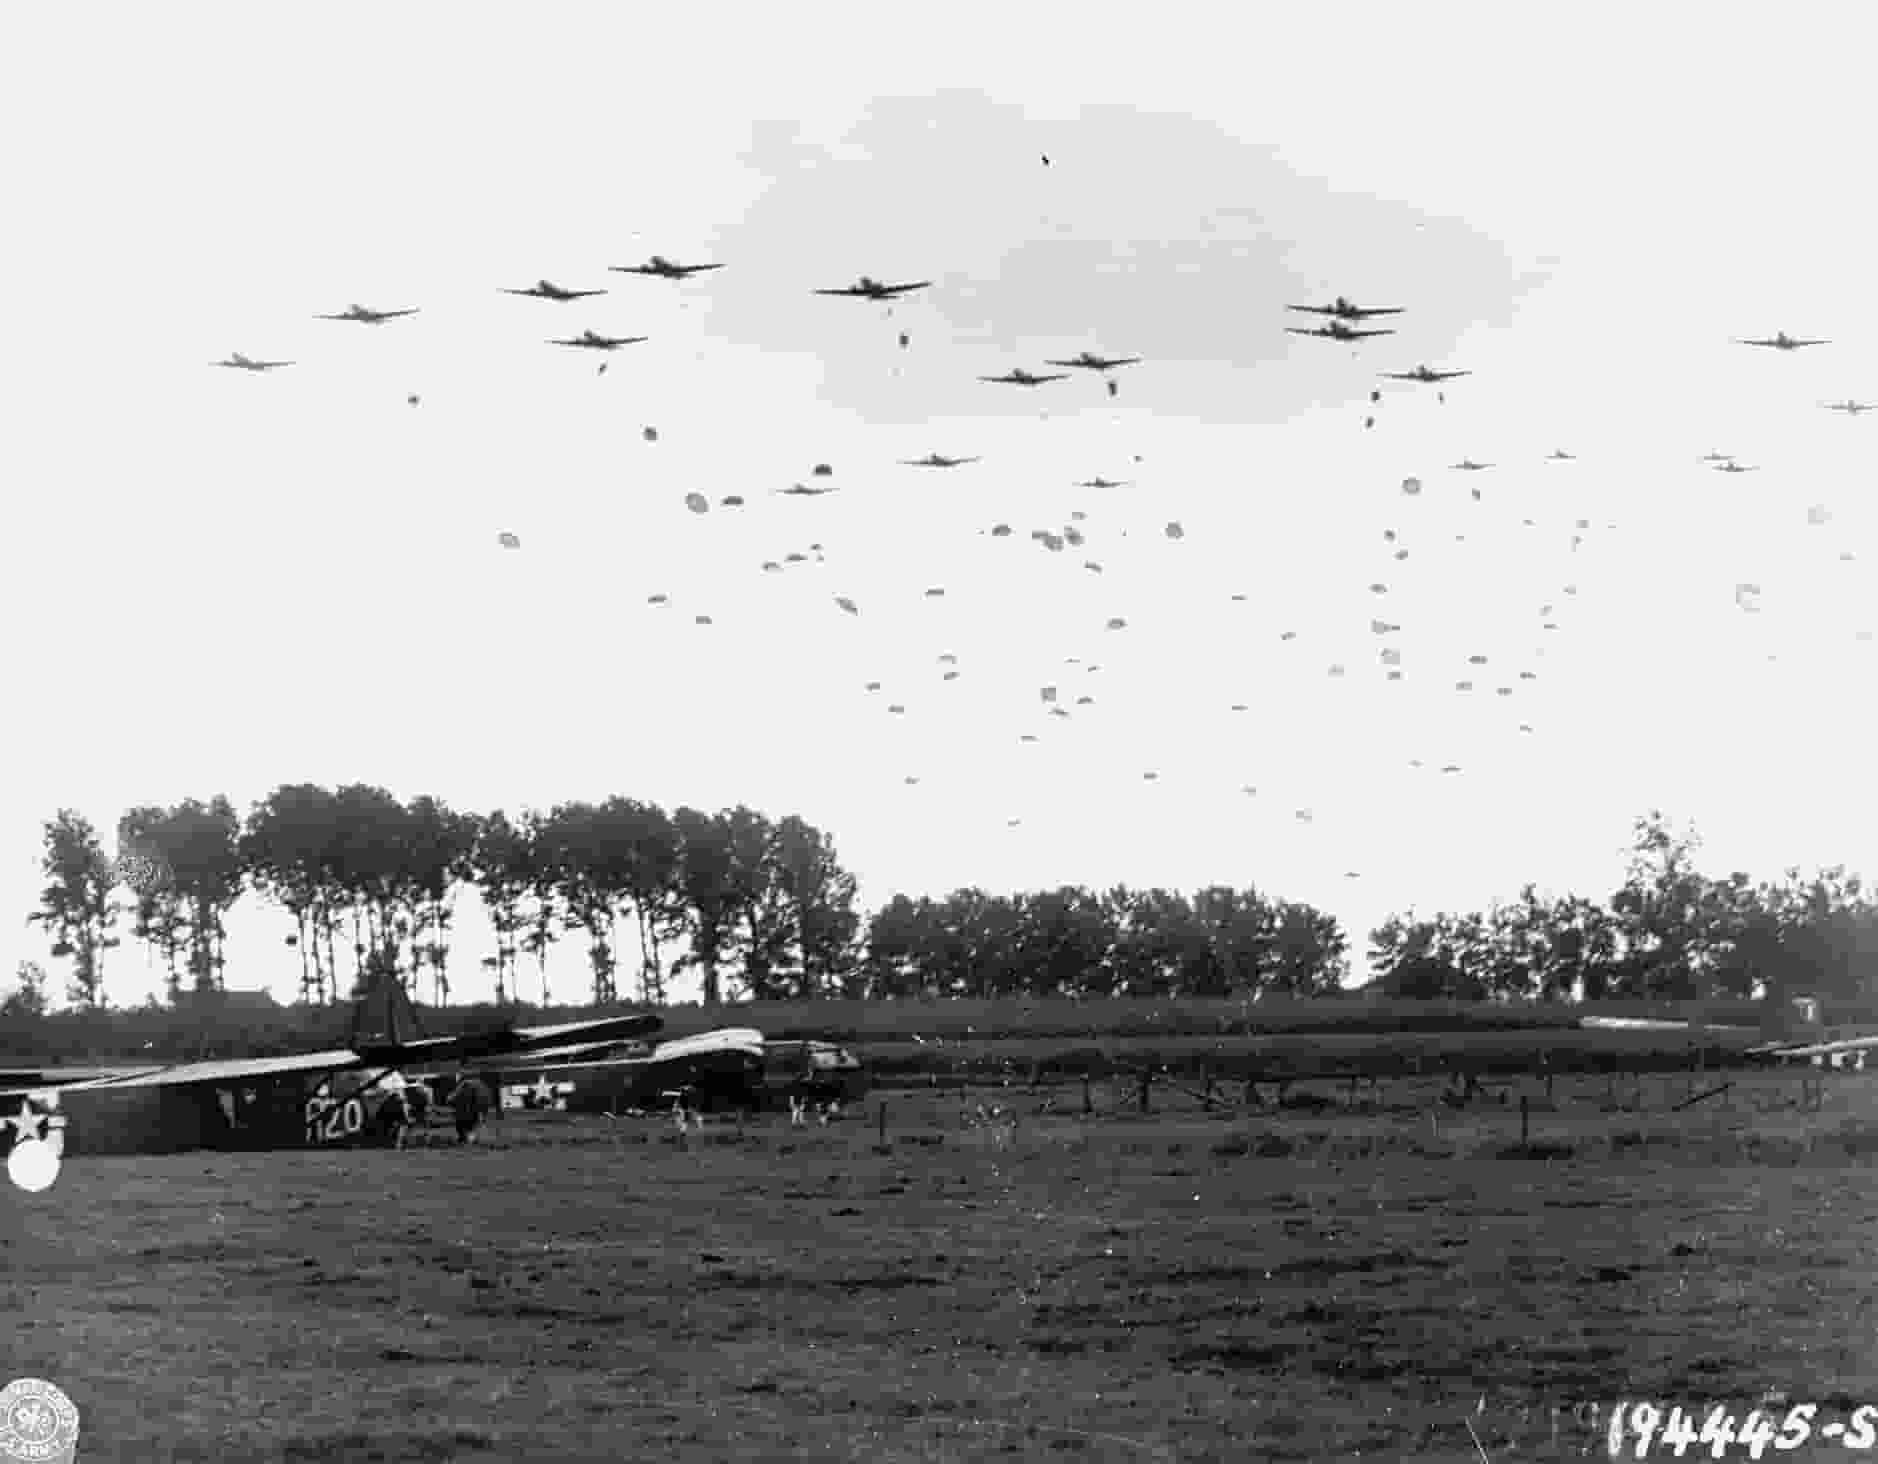
On 17 September 1944, around 20,000 Allied airborne troops were dropped across the Netherlands. The American divisions landed near Eindhoven and Nijmegen, while the British 1st Airborne Division landed near Wolfheze and Oosterbeek.
The landings themselves were largely successful. German anti-aircraft fire was weaker than feared, and most of the British troops came down safely. But the distance from the drop zones to Arnhem immediately became a problem. The paratroopers had to march several miles before they could even begin their main mission.
At the same time, XXX Corps began its advance north from Belgium. The plan gave the corps roughly 48 hours to reach Arnhem, passing through Valkenswaard, Eindhoven, Son, Veghel, Grave, Nijmegen, and Elst. But the route was narrow, exposed, and crowded with obstacles. By the end of the first day, XXX Corps had advanced only about seven miles, reaching Valkenswaard instead of Eindhoven.
The Race to the Bridge
Most of the British force moved toward Arnhem, but German resistance slowed them down. Roads were blocked, bridges were blown, and German units attacked the paratroopers as they tried to advance.
Only one battalion found a route through. Lieutenant-Colonel John Frost’s 2nd Battalion took the southern riverside “Lion” route and met far less opposition than the rest of the brigade. It reached the northern end of the Arnhem road bridge by the evening of 17 September. His men occupied buildings near the bridge and prepared to hold it until reinforcements arrived.
This was a major success. The British now controlled the northern end of the bridge that the entire operation needed.
But Frost’s force — around 750 men, including engineers and brigade headquarters staff — was isolated. It had five six-pounder anti-tank guns, but no artillery and few anti-tank weapons. The rest of the division had been delayed or pushed back by German resistance, and the paratroopers at the bridge had limited ammunition and no reliable way to call for help.
Radios Fall Silent
As the battle developed, the British radio network began to fail.
The paratroopers’ wireless sets had limited range, and the wooded ground around Oosterbeek made communication even more difficult. As units moved apart, they lost contact with divisional headquarters, with the RAF, and with XXX Corps.
This had serious consequences. Commanders could not accurately direct their troops, request artillery or air support, or organise supply drops. The RAF could not always find the correct drop zones, and much-needed ammunition and equipment sometimes fell into German hands.
The failure of communications did not cause the disaster on its own, but it made every other problem worse. The British force was already divided, under attack, and waiting for relief. Without reliable radios, it became even harder to coordinate a defence.
The Germans Strike Back
The German reaction was fast and powerful. Lieutenant-General Wilhelm Bittrich’s II SS Panzer Corps contained the British force around Oosterbeek and sent tanks and infantry against Frost’s men at the bridge.
On 18 and 19 September, Frost’s battalion came under repeated attack. German troops attacked from the south, while tanks and artillery shelled the buildings around the bridge. The British paratroopers fought from houses, gardens, and rubble, but they were running out of ammunition, food, and water.
Frost’s men held only the northern end of the bridge. A Company made two attempts to take the southern end during the first night, but the southern approaches were soon too well defended for a third attempt. This mattered because XXX Corps could not have crossed the bridge without control of both ends.
Meanwhile, the rest of the division was pushed back into a shrinking perimeter around Oosterbeek. Major-General Robert Urquhart’s men were now defending a small area west of Arnhem, cut off from Frost and unable to break through to the bridge.
The plan had expected the airborne troops to hold Arnhem for a short time. Instead, they were fighting a desperate defensive battle with no clear way out.
XXX Corps Falls Behind
Farther south, XXX Corps was making progress, but not quickly enough.
The American 101st Airborne Division captured bridges around Eindhoven, and XXX Corps linked up with them on 18 September. But the advance was delayed when German troops destroyed the bridge at Son. British engineers had to build a temporary Bailey bridge before the tanks could continue.
The 82nd Airborne Division fought hard for the bridges around Nijmegen, but the final bridge over the Waal was not captured until 20 September. XXX Corps could not cross in force until the following day.
Every delay mattered. The British paratroopers at Arnhem were being worn down while the tanks they needed were still fighting their way north.
The Bridge Is Lost
On 21 September, the Germans recaptured the northern end of the Arnhem bridge. Frost’s men had held out for three days and four nights, but they could no longer continue. Many were wounded, exhausted, or out of ammunition.
The last message from the bridge became famous: “Out of ammunition. God save the King.”
With the bridge lost, the operation changed. The Allies were no longer trying to cross the Rhine at Arnhem. They were now trying to save the surviving British and Polish troops trapped on the north bank.
The Polish Brigade Arrives
The Polish 1st Independent Parachute Brigade, commanded by Major-General Stanisław Sosabowski, was meant to reinforce the British force on the third day of the battle. Bad weather and a shortage of transport aircraft delayed the parachute drop until 21 September.
The Poles were dropped south of the Rhine at Driel, under German fire. This was where they were meant to land, but the Heveadorp ferry they had hoped to use to cross the river had been destroyed. Many Polish troops could not reach the British perimeter at Oosterbeek, so they dug in around Driel and fought their own battle on the southern bank.
Only 35 of the first 55 Polish troops who tried to cross by boat reached the British positions. On 23 September, the Poles managed to put about 153 men across the river. Around 160 Polish paratroopers were eventually evacuated. The rest remained on the southern bank, where they helped cover the British withdrawal.
The brigade lost about 590 men, roughly a quarter of its fighting strength. About 90 were killed and around 110 were captured. It was a serious loss, but not as large as the British 1st Airborne Division’s.
The Escape Across the Rhine
By 24 September, the British perimeter at Oosterbeek had become too small to hold. The survivors were exhausted, short of ammunition, and surrounded by German troops on three sides.
On the night of 25 September, the British began Operation Berlin — the evacuation across the Rhine. XXX Corps artillery fired from Nijmegen to cover the withdrawal, while British and Canadian engineers used boats to carry men across the river.
The evacuation was dangerous. The perimeter was only about 750 yards wide, and German mortars continued to fall as the men moved toward the river. Darkness and heavy rain helped hide the withdrawal, and about 2,400 men were brought across the Rhine to safety.
Imperial War Museums — What Went Wrong at the Battle of Arnhem
Imperial War Museums — Why Did Operation Market Garden Fail
National Army Museum — Operation Market Garden
Encyclopaedia Britannica — Operation Market Garden (1944)
wikipedia - Operation Market Garden
BBC History — The Battle of Arnhem (Operation Market Garden)
The Drop Zones Were Too Far Away
The first major problem came before the fighting began. The British 1st Airborne Division was dropped 8–10 miles from Arnhem because Allied commanders feared anti-aircraft fire near the town. This gave the Germans time to react and forced the paratroopers to fight their way toward the bridge instead of capturing it immediately.
Frost Reaches the Bridge
The most important Allied success came on the first day. Frost’s 2nd Battalion reached and held the northern end of the Arnhem road bridge. For a short time, the key objective of the entire operation was in British hands.
But the battalion was isolated, lightly armed, and waiting for reinforcements that never came in time.
The Radios Fail
The failure of communications made the situation much worse. Units could not coordinate, request support, or organise supply drops. The British force was divided, under attack, and unable to communicate effectively with the RAF or XXX Corps.
The Germans Were Stronger Than Expected
Allied intelligence underestimated the German forces near Arnhem. Elements of two SS Panzer divisions were in the area, with tanks, artillery, and experienced troops. The warning was available, but it was not acted on.
XXX Corps Was Too Slow
The ground advance could not keep up with the plan. Destroyed bridges, traffic jams, German resistance, and the narrow raised road slowed XXX Corps. By the time it reached the Rhine, the bridge at Arnhem had already been lost.
Imperial War Museums — What Went Wrong at the Battle of Arnhem
Imperial War Museums — Why Did Operation Market Garden Fail
National Army Museum — Operation Market Garden
Encyclopaedia Britannica — Operation Market Garden (1944)
wikipedia - Operation Market Garden
BBC History — The Battle of Arnhem (Operation Market Garden)
The Cost of Arnhem
The battle was a major Allied defeat. Around 8,000 British and Polish troops became casualties during the attempt to hold Arnhem, including those killed, wounded, or captured. The 1st Airborne Division suffered around 80% casualties.
The Polish brigade lost about 590 men, roughly a quarter of its fighting strength. About 90 were killed and around 110 were captured. The rest of the brigade remained on the southern bank of the Rhine, where it had been deployed by plan.
The human cost was enormous, and the failure left a deep mark on the units involved.
What the Operation Achieved
Operation Market Garden did achieve some of its objectives. The Allies captured Eindhoven and Nijmegen, and XXX Corps advanced further north than it had before. The American airborne divisions successfully took most of the bridges assigned to them.
But the main goal — crossing the Rhine at Arnhem and entering Germany — was not achieved. Without the final bridge, the corridor could not be completed, and the offensive stalled.
The operation showed that even a carefully prepared airborne assault could fail if the ground forces could not arrive in time.
Why Arnhem Failed
Arnhem failed because of a chain of problems, not one single mistake.
The British paratroopers were dropped too far from their objective. They were lightly equipped and had to fight through German resistance before reaching the bridge. Their radios failed, making coordination difficult. German forces were much stronger than expected. And XXX Corps could not reach them in time.
But these were not just problems of execution. They were also weaknesses in the plan itself. The operation was rushed, based on optimistic assumptions, and depended on everything going right. When several things went wrong at once, the entire operation collapsed.
A Bridge Too Far
The phrase “a bridge too far” was not invented after the battle. It came from a warning attributed to Lieutenant-General Frederick Browning before the operation, suggesting that the plan might be asking the Allies to advance too far beyond what they could support.
The phrase later became famous through Cornelius Ryan’s 1974 book and the 1977 film, but its meaning was clear from the start: the final bridge at Arnhem was the one the Allies could not reach in time.
The battle remains one of the most famous Allied defeats of the Second World War, not because the soldiers failed, but because the plan asked too much of them.
Imperial War Museums — What Went Wrong at the Battle of Arnhem
Imperial War Museums — Why Did Operation Market Garden Fail
National Army Museum — Operation Market Garden
Encyclopaedia Britannica — Operation Market Garden (1944)
wikipedia - Operation Market Garden
BBC History — The Battle of Arnhem (Operation Market Garden)
The Ground
Where it was fought
Explore more
You Might Also Like
Ranked by country match, then era, then how close the battles were in time.